Tuesday, December 12, 2006

Get more sleep this Christmas Eve - make Santa Sacks

Every year, I run into the same problem. I wrap as much as I can before Christmas, but I can't pull out the bigger Santa gifts until after the kids go to bed on Christmas Eve. My husband and I are usually up for hours trying to get everything assembled and ready for Christmas morning. In addition to the assembly process, I'm usually scrambling to find a big enough piece of wrapping paper to cover these generally large and awkwardly shaped gifts.

This year, I read about a solution in Family Fun magazine that I thought we'd try. We're calling them our Santa Sacks. Essentially, they function like a giant stocking. On Christmas Eve the kids put these big fabric bags under the tree and in the morning all their gifts from Santa are hidden inside (their family gifts are wrapped and tucked under the tree). I told my kids that we were making them to help make the elves' job a little easier. I didn't mention that it would help Mom and Dad get to bed a little earlier and have a lot less mess to clean up in the morning.

Each bag took me around an hour to make and cost around $13. I purchased 3 yards of Christmas fabric, 3 yards of muslin, and 2 yards of red rope for each bag. I made mine with a white muslin lining, but if you're in a hurry you could skip it and just stitch the sides of the patterned fabric together. I'm not much of a seamstress, so I kept it pretty simple and sewed it like a giant pillowcase. I added the braided rope to the top of the bag to make it cinch-able and a little more Santa like. I'm also adding a small laminated tag to the rope with their name, the year and this year's school picture so Santa can know which is which. Each year we'll add another tag to the sack.
I made them with Christmas morning in mind, but I didn't realize how often we'd use them before Christmas. My kids have loved playing with them. They've pulled them out for everything from sack races to steam rolling. Tonight we held a family movie night. Everyone got in their comfy pjs, hopped inside their sack, and curled up on the couch to watch a favorite Christmas movie. I haven't seen them work on Christmas yet, but so far…I think they've been worth it. Just thought I'd pass it on.

Sunday, December 03, 2006

Survive Christmas - Make a Christmas Game Plan

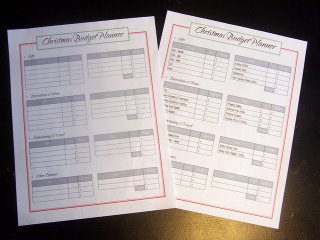
This is a crazy time of year. It seems like there is an endless to-do list full of impossible tasks. This year I decided to hit my three biggest trouble spots head on and get organized before the craziness gets into full swing. I created these printable planners to help me keep track of all the little Christmas details.

First off, I made a weekly breakdown of my tasks. Similar to my "Mom Game Plan" mentioned in a previous post, this weekly list of to-do's really helps me focus. I break down the 4 weeks before Christmas (I just finished week 1) into 4 work weeks:

Week 1: Decorate and Plan
In this week I focus on making a plan. I plan out my gift list, my budget, and my calendar. I also get the house ready for Christmas…inside and out.

Week 2: Shopping Phase 1
During this week, I focus on buying, wrapping and shipping all extended family and non-family presents. This includes things like neighborhood gifts, gifts for Grandma's and Grandpa's, teacher gifts, etc. I also create and send my digital Christmas cards this week.

Week 3: Shopping Phase 2
During this week I focus on buying and wrapping all immediate family gifts. This includes Santa presents, stocking stuffers, etc. I also use this week to make any freezable food ahead of time and make or buy the Christmas PJs.

Week 4: Deliver and Celebrate
This is crunch week. In this week our family delivers all the gifts to neighbors and teachers. I also finish up any wrapping and get the Christmas Eve supplies together.

There are lots of little to-do's on my list that aren't mentioned here. On my website (http://www.meckmom.com/) I posted both and blank version for you to print and a sample version that's been filled out to give you ideas.

I've also got a Christmas gift planner on my website for you. It's amazing how many gifts there are to keep track of. Rather than impulse buy and scramble for ideas, I use this gift planner to help me keep everything straight. It also helps me keep track of which presents are wrapped and which have been shipped. You can find this handy file on my website as well.

As much as I hate to do it, I have to set up a budget for my Christmas spending. Tallying up all the gifts, decorations, party supplies, and food expenses can be really daunting; but I've found that if my husband and I work together to set a limit and then breakdown that limit into the various categories listed on my sheet, we save ourselves from the horrible post-Christmas financial drought. I posted both a blank version and a sample version on my site.

I can't promise these files will make your Christmas preparations stress-free. However, getting you game plan down on paper, planning out your gifts, and making a budget should help you reach New Year's with your sanity still intact. Just thought I'd pass it on.

You can find all these files in the Downloads:Organization section of my website (http://www.meckmom.com/). Posted by Picasa

Thursday, November 30, 2006

A simple little Advent Calendar that works

There are dozens…if not hundreds...of advent calendars out there. We've tried many different complicated varieties over the years. Invariably, we start out strong and then by mid-December we start forgetting and have to play catch up for the days we missed.

A couple of years ago, I created a simple Christmas tree advent to help my kids keep track of the days. Much to my surprise, we managed to follow through with it every day. We kept it on the fridge so we wouldn't lose track of it. Each morning whoever managed to get ready and sit down to breakfast first got to color in (or put a sticker on) one of the ornaments on the tree.

It became a fun little race each day and motivated the kids to get moving in the morning. Now that they're a little older, I think I will print out one for each of them and let them keep in in their school folders or on their bedroom doors.

I recreated the Christmas tree file this year and thought I'd post it on my website. It's not fancy or particularly creative, but that's the beauty of it. It's a 'no-mom-required' solution that works. Just thought I'd pass it on.

You can find this file in the free download section of my website www.meckmom.com. Posted by Picasa

Sunday, November 19, 2006

Money and time saving Christmas Cards

December is a crazy month for our family. With three birthdays and Christmas all falling into a few short weeks, I'm forced to find creative ways to save myself time and money. One of my favorites, is our digital Christmas Card.

Christmas cards can take up tons of valuable time…getting the perfect picture, getting prints, tracking down addresses, you know how it goes. Last year, in an effort to save myself the hassle, I decided to create a digital version. I used the pictures I had stored in Picassa (see previous post) and another free program called Microsoft Movie Maker. The end result was a fun, 2-minute glimpse of our year in photos that I was able to email to my family and friends.

I'd never used Movie Maker before, but I found it really easy to work with. I simply imported 20 of my favorite pictures from Picasa as well as an instrumental Christmas song from one of my CDs. Once the photos were in the program, I arranged them into sections (I did a spotlight on each child and then a section of family fun). Next, I inserted some transitions between the photos (they're built into Movie Maker) to help it flow from one picture to another. Technically, you can add video clips as well, but I didn't want to devote the time to editing. I also used a graphic design program to add in title slides (like the one pictured here) but if you're not tech savy you could skip those and just use the title pages that are included in Movie Maker.

Once I was happy with it, I saved it and composed a traditional Christmas card-type letter for the body of the email. I chose a Christmas-themed email stationary, attached the Movie Maker file, and added all the recipients. Thanks to the wonders of email, my digital Christmas card was instantly shared with over 50 family & friends. It was quick, efficient and best of all...free.

If you're a little more traditional and would rather go with mail, Movie Maker can help you too. You can create a CD of your file within Movie Maker with a simple click of a button. Add a cute Christmas label and you can mail the CDs to everyone on your list.

I know this isn't the right solution for everyone. I sure there are tons of you out there that love the whole Christmas-card making process. As for the rest of you…you may want to give this easy and free alternative a try. It worked for me. Just thought I'd pass it on.

If you have a newer system, you probably already have Movie Maker installed. If not, here's the link: http://www.microsoft.com/windowsxp/downloads/updates/moviemaker2.mspx Posted by Picasa

Thursday, November 09, 2006

A great solution to organizing and sharing your photos

I'm horrible at journaling. It's one of those things I've always wanted to be good at, but can't seem to do consistently. In an effort to save my memories until I have time to jot them down, I take tons of pictures and videos. However, after awhile the hundreds of digital media files can be overwhelming to keep organized. I don't have the time, budget or energy to scrapbook, so I opted for an easier digital solution.

About two years ago I discovered Picasa. It's a clean, efficient, and free program available from Google. Essentially, Picasa searches your hard drive, finds all the image files and organizes them for you by date. Once Picasa adds them to its library, you can label them and organize them into virtual 'albums'. Picasa also offers great tools to edit, print, email, or blog whatever you've got stored.

I love it because it doesn't actually alter any of the original files. If I crop and lighten a picture, I can come back months later and undo any changes with a simple click of a button. They also have a great search tool which allows me to find specific pictures quickly and easily. For example, my daughter's teacher needed a picture of her in her Halloween costume for a class project. I typed in her name and the word 'ladybug' and Picasa showed me only the pictures that had those two words included in the label. I was able to find the exact picture I was looking for in just a few seconds. I hit print, threw it in her backpack and she was good to go.

Earlier this year, I decided I wanted to filter through all my photos this way, so I bought a scanner and scanned all our old prints. Picasa added them automatically and I labeled them as they loaded. Now I've got all our family's pictures in one place and they're completely searchable.

One of the great things about Google programs is that they are always improving them. A new feature they've added in Picasa2 is called Web Albums. Web albums allow you to upload tons of pictures (you get around 1000 for free and can pay to upgrade) into albums that your friends and family can view, print, or download anytime. It's kind of like having a digital scrapbook on your own webpage. It's also a great way to back-up the photos stored on your machine. If for some horrible reason my laptop crashes I know that I can just click over to my web album and download all my photos instantly.

It's no journal and it's certainly not the beautiful finished product that you scrapbookers produce, but it works for me. It's simple, efficient and free. It's tough to beat that. Just thought I'd pass it on.

Here's the link if you're interested: http://picasa.google.com/index.html

Wednesday, November 01, 2006

A creative way to get rid of Halloween Candy Overload

After 3 Halloween parties, a ward trunk-or-treat, and a big night of trick-or-treating my house and my kids are in Candy Overload. Rather than watch my kids gorge themselves on junk food all week, I opted to try something new this year. We're calling it our post-Halloween Sweets Swap.

I spent $10 at Target and purchased a few small toys that I know my kids would like. I also made up a few coupons like "Trip to the McDonalds play land", "Get out of chores pass", and "Mom makes my bed". Each item has a candy price. For example, the 'Get out of chores' coupon is 30 candy pieces, the Matchbox car is 20. When the kids get home from school today, I'll set out the store and have them swap their junk food for more tummy-friendly alternatives. This way, they only hang on to the candy they really love and I get to save myself from a week of spoiled suppers and crumpled candy wrappers. It's a win-win. Just thought I'd pass it on.

I wish I could remember where I read/heard the original version of this swap. I know it came from somewhere but I can't seem to place it. Whoever you are, thanks for the bright idea!

Saturday, October 28, 2006

Help your kids keep track of their winter gear

It's that time of year again. Time to keep track of dozens of cold weather accessories. It seems like it takes forever to get to the car because you have to factor in all the mitten search time. Rather than continue to waste time hunting, I opted for this easy solution.

We don't have a mud room I our house, so I'm limited on space to hold things like shoes backpacks and winter accessories. I converted the lower half of our coat closet into our 'mini mudroom'. Along one side and across the back of the closet I added large hooks to the walls for backpacks and kid coats. On the other side, I added this 3-drawer plastic organizer for all their winter gear.

When the kids come in from school, they unload all their gear in the closet and dump their hats, scarves and gloves into the drawers. The drawers are clear so it's easy for even my youngest daughter to figure out where her things belong.

We used this inexpensive system all last winter and it worked great. As an added bonus, when Spring finally did come around, I simply moved the drawers to the basement. A few weeks ago when the weather started turning again, I pulled it back out…all the hats, gloves, and scarves were inside and ready to go. It's simple, inexpensive, and totally kid-friendly. Just thought I'd pass it on.

Remember, you can download these handy labels and many other files on my website: www.meckmom.com.

Wednesday, October 18, 2006

Simplify the TV for your kids with this handy remote

About a year ago, we added a TV to the toy room in our basement. The kids loved having it, but I hated going up and down the stairs over and over again to help them find a good channel. One afternoon I came down to find my 6 year old watching a steamy soap opera and decided I needed to do something. We almost got rid of the TV; then I found this handy solution.

I bought this universal kid-friendly remote on eBay for around $9. It's called a Weemote and it's made by Phillips. It's designed to allow you to program up to 5 mom-approved channels. The remote has big, colorful, numbered buttons that are very easy for the kids to learn; even my 3 year old can do it. For example, if they want to find the Disney channel, they don't have to remember numbers, they just push the yellow star. There's also a power button, volume control, and a channel changer that will only rotate through the 5 approved channels.

It can be programmed to work with any TV. The set-up was incredibly simple. It took me about 2 minutes. My treadmill is downstairs too, so if want to bypass all the Weemote programming I just grab the original remote or manually push the buttons on the TV. I noticed online that they also make a DVD player version, but I haven't tried it yet. If any of you have, make a comment on this post so I can find out if you like it as much as I like this one. :)

To help my kids keep track of their remote, I stuck some sticky-back velcro on both the back of the remote and the side of the TV. Now it has a place and doesn't get swept into the toy bucket on clean-up day. Sadly, it won't stop the fighting over who gets to hold the remote, but I haven't changed a channel in over a year which makes it a keeper in my book. Just thought I'd pass it on. Posted by Picasa

Wednesday, October 11, 2006

End those midnight runs to Walgreens with this simple solution

We've all been there. It's 2 o'clock in the morning and of your kids has a fever. You fumble around the kitchen trying to track down those little plastic thermometer things and your half-empty bottle of Tylenol. After many late night trips to Walgreens, I came up with this simple solution.

I bought this inexpensive 3-drawer organizer at Target for around $7. I divided our medicine stash into 3 sections.

Supplies: This drawer hold all the extra stuff like thermometers, Vapo rub, dispensing syringes, cough drops etc.

Adult Meds: This one holds all the medicines for adults

Kid Meds: This one holds all those boxes of chewable tablets and syrup bottles

This handy box sits on the top shelf of my pantry. Obviously, it's not a revolutionary system, but its simplicity is what makes it work. Now when my daughter comes into my room in the middle of the night I just pull the whole kids meds drawer out of the box, find what I need and slip it back in. It's simple, cheap, and incredibly useful. Just thought I'd pass it on. Posted by Picasa

Monday, October 02, 2006

Simple bed-in-a-bag solution for guests

Unfortunately, we don't have a guest bedroom in our house, so when we have company I have to be able to put a bed together in a hurry. Rather than stuff my linen closet with the extra sheets, pillows and blankets, I came up with this handy solution.

I created my own bed-in-a-bag by using these giant Ziploc bags available at any superstore. Fancier vacuum-type bags would also work really well, but they were too expensive so I went for the cheaper version.

First, I labeled them with a magic marker according to size (twin, queen/king). Next, I folded the sheets and pillow cases according to size and added them to the bag. For the twin bedding, I was also able to fit in the blanket and pillow. For the queen/king, I fit the sheets and both pillows but used a separate bag for the quilt and duvet. Finally, I added a few dryer sheets to the bags to keep them smelling fresh.

These bags seal so well, that I'm able to stash them in the basement and save the linen closet for my day-to-day towels and sheets. When I have a guest coming over, I just run downstairs, grab one of these bags, and set up the room. It's quick, convenient, and hassle-free. Just thought I'd pass it on. Posted by Picasa

Sunday, September 24, 2006

Save time, make a Mom game plan

When it comes to being a fun mom, spontaneity is critical. However, when it comes to being a functional mom a standard routine can be a lifesaver. I created this fridge cheat sheet to help me remember my basic game plan each day.

I can't say that I've ever followed it exactly. In fact there are many weeks that I fail across the board. But this simple schedule at least gives me a goal to shoot for in a few of the key areas. My chart is divided into 4 sections areas: Exercise, Cleaning, Scripture Study, Dinner. Here's what I've got listed:

Monday:
Treadmill, Kid Laundry & Living Room, Daily Reading, Soup/Sandwich

Tuesday:
Volleyball, Bedrooms & Linens, Ensign/Gen. Conf., Chicken

Wednesday:
Treadmill, Kitchen & Mopping, Daily Reading, Pasta

Thursday:
Weights, Grocery Shopping & Organizing, Sunday School Lesson, Breakfast Dinner

Friday:
Treadmill, Bathrooms & Adult Laundry, Daily Reading, Pizza

Saturday:
Run Outside, Car/Basement/Outdoor, YW Lesson Prep, Beef or Pork

Sunday:
Day Off, Bills & School Prep, Relief Society Lesson, OPEN

You can download the chart on my website (http://www.meckmom.com/) or recreate your own based off what you see here. It's a pretty basic plan, but it makes a huge difference for me. Plus, having these basic decisions made ahead of time (like having some idea of what I'm going to make for dinner) allows me to juggle the other 700 decisions we mom's have to make on any given day. Just thought I'd pass it on. Posted by Picasa

Monday, August 28, 2006

Never wash a germy dish cloth again

I've used these blue "shop towels" in the garage for years. Then one day, I ran out of paper towels in the kitchen and used these as a backup. I was amazed at how well they held up under water. They have the convenient disposablity of paper towels, but never fall apart when wet; even after a full sink of dishes. You can ring them out and reuse them over and over again. In fact, one of these towels usually lasts me the entire day.

They worked so well that eventually I pitched all my old germ-carrying dishcloths and bought a paper towel holder for under the sink. I still keep paper towels on my counter for little spills and touch-ups, but when it comes to dishes and wiping down kitchen surfaces, I always grab one of these. I buy mine in bulk at Costco, but you can find them at almost any super store in the automotive section. Just thought I'd pass it on. Posted by Picasa

Thursday, August 24, 2006

Save yourself from backpack clutter with family inboxes

School is starting again…which means seas of pastel colored papers coming home in backpacks. Of course the problem is that we get a random assortment each day. Homework, reminders, permission slips…it's tough to keep it all straight. Rather than let my counter clutter up, I created this inbox system in my kitchen cupboard to help me manage the clutter.

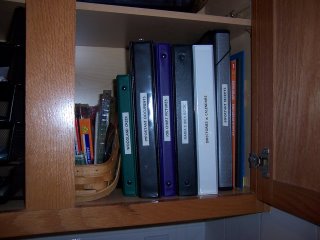
Since the kitchen is the hub of our home, most of my organization centers there. I devoted the lower shelf of one cupboard to keeping the family organized. On the right side are my many binders (mentioned in a previous post). On the left, are these inexpensive inboxes I purchased from WalMart for around $10.

I labeled one inbox for every member of the family. Essentially the inboxes are temporary storage. As the backpacks come off, the kids put any homework on the fridge. Everything else goes into their inbox. Sometimes I get a minute when the kids are in the tub, but generally I don't get a chance to go through the boxes until the kids are in bed. By then I've usually got a little time to sign things, write checks, and add notes to my calendar. Then I return stuff back to their backpacks and look forward to a slightly less hectic morning.

I also use the inboxes to stash lots of things for myself and my husband. For example, If I'm going through a catalog and see an idea I like, I rip it out and stick it in my inbox. Later, when I have time, I add it to my Design Ideas Binder. They also come in handy when I find a pile of my husband's random papers and post-its. Rather than try to figure out what they are, I toss them into his inbox and tell him to look there first.

It's a simple system, but it works…and it's well worth the cupboard space. Just thought I'd pass it on. Posted by Picasa

Friday, August 04, 2006

Announcing MeckMom.com - Blogs, Files & More

Over the past few months, I've posted many of my favorite bright ideas on this blog. As my readership grew, many of you have emailed me requesting the files I used to create my various charts and labels. Afterall, what good is a bright idea if you have to waste your time to try and recreate the files that are sitting on my computer? Rather than try to keep up with the email, I've opted to create a site that will house all of my blog ideas as well as the free file downloads I used to create them.

You'll find my new site at www.meckmom.com. It's a work in progress, but hopefully you'll bear with me as I get things posted. It's a fairly simple site. No ads or distractions, just bright ideas and simple solutions that I've found helpful over the years.

A few of the things you'll find on MeckMom.com:
Organizing Bright Ideas Blog: All of the posts you'll find on my blogger site with options to rate your favorites and add comments on how you improved the ideas.
LDS Bright Ideas Blog: Any bright idea I come across related to LDS callings and home life. Object lessons, scripture study ideas, and calling organizing ideas. This one is new, so you won't see much now, but there will be more to come.
Party Bright Ideas Blog: One of my favorite hobbies is creative party planning. When I come upon great ideas or try out a new party or family fun idea, I'll post it here. Again, this one is new, so it's a little bare at the moment, but it will grow.
Downloads: Here you'll find many of the files I mention in my blogs as well as several that I think you might find handy. Most of the files are in MS Word and are completely adaptable to your family's needs.
Links: I'm out exploring the web a lot. As I come upon sites I love or find particularly helpful, I'll add them to my links section.

You'll notice, that this site is not a message board-type site. I know there are many of those out there and I think they serve a great purpose. However, I don't want the stress of sifting and screening other people's ideas. My intention with this site was not to create a communication hub for compulsive organizers and party planners. Rather, I wanted to give myself an outlet the many files and ideas I've used over the years. I know it's selfish, but this is a hobby for me, I want it to be fun...not stressful. That being said, I want you to feel free to comment and improve upon anything you see. I love your comments and feedback. They keep me motivated and help keep my creative juices flowing.

Thanks again to all of you for support. I hope you enjoy the new site and continue to check it as it grows. If you do find it useful, please pass it on. Checking the site statistics and watching the numbers grow is my favorite way to get rid of my "I'll never catch up on my laundry" blues. Take care.

Sincerely,
MeckMom

Friday, July 28, 2006

Help your kids save with a Family Bank

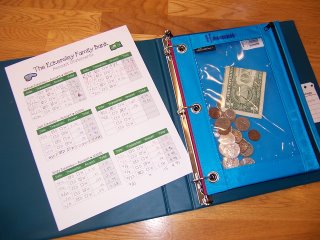
It's a dilemma. We want our kids to learn the value of money, but they can't seem to keep track of it. I dread cleaning up loose change almost as much as I dread hearing my kids fight over the dime they found in the couch cushions. I created this family bank to save me from becoming the referee and hopefully teach my kids a few money saving strategies at the same time.

The bank is a simple three-ring binder kept in my kitchen cupboard. Inside the binder I have one zippered pencil pouch for each of my kids. On the front I keep a statement sheet. The sheet has an simple table for each kid to jot down their deposits and withdrawals.

Behind the kid's pouches, I have another pouch that holds a calculator and a tithing envelope for each of the kids.

Whenever they get their allowance, earn money from a money job, or get money gifted to them. We pull out the bank binder. I help them write out the deposit amounts on the statement sheet and then make a 10% withdrawal for tithing.

I don't force them to deposit their money, but we do have a rule that if someone finds money in the couch cushions…or anywhere else, it goes into the family jar we keep on top of the fridge. When they decide they want to spend their money we simply pull out the pouch and take it with us to the store. On fast Sundays, we pull out the tithing envelopes and bring them to church with us.

It's a simple system, but it has made a huge difference for me. My kids are excited to save and the fights are a thing of the past. As a side bonus, the whole tithing concept is much clearer for them. Just thought I'd pass it on.
Posted by Picasa

Monday, July 17, 2006

Help kids dress on their own with belly button dots

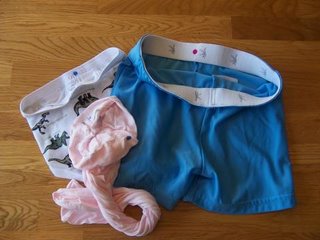
It's inevitable. You want your kids to be independent and get themselves dressed, but all too often they wander out of their room with some of their clothes on backwards. A simple magic marker trick helps my kids with this common problem.

I teach my kids to look for the dot rather than just the tag. It's easier for them to check the front, so I use a brightly colored permanent marker to make an eraser-size dot in the waistband of their underwear, pants, tights, shorts, and pajamas. When they're getting themselves dressed, they just look for the dot and remember to put it close to their belly button. As a side note, I also use a thin-point magic marker to write sizes on the back waistband of any untagged items like tights.

Like the shoe arrows I mentioned in a previous post (
http://meckmom.blogspot.com/2006/03/help-your-kids-get-their-own-shoes-on.html), this is a very simple little trick that will save you time and your kids tons of uncomfortable mistakes. Just thought I'd pass it on.

Monday, July 10, 2006

Bunk Bed Bedding Solution

I've always hated making bunk beds. It's such a pain to try to reach up to the top bunk to tuck in the excess. My girls have a hard time too. We struggled with it until I came across this bright solution.

You should know, this solution will only work if you intend to keep your beds up against the wall. My girl's room is too small to have freestanding beds, so this worked great for me.

Rather than buy two twin size quilts. I bought one king size and cut it right down the middle. Luckily, king size children's bedding is almost always the first to go on sale, so I got a steal (as a bonus, they usually come with a pair of shams). After cutting the quilt, I simply stiched up the rough edges. It wasn't particularly pretty, but it didn't matter because no one ever sees the wall side.

The quilts look normal from the room side, but actually only hang down 2 or 3 inches on the wall side. It's so much easier for my girls to make their beds now that they don't have to fiddle with the extra width. The king size is a little longer than the regular twin size, but that actually helps too. I fold the excess length under the mattress and tuck it under the mattress supports. It helps keep the quilt from shifting all over and makes it easier for the girls to straighten.

I've washed these quilts tons of times and so far, the edges have held up well. I'm sure it won't last forever, but getting 2 sets of bedding for under $40 is tough to beat. Just thought I'd pass it on. Posted by Picasa

Wednesday, July 05, 2006

Control your mail clutter with this simple file system

I must admit, there are probably much prettier ways to control mail chaos. However, for me, my priority is simply to get it out of my way. I generally get the mail on the way in from running errands or picking kids up from school. Consequently, my hands are always full and I have little to no time to deal with the mess. I created this simple folder system to help me get the mail off my counter and out of the way... in less than a minute.

This file-folder holder, designed for offices, sits on my kitchen counter. I purchased both it and the folders inside for less than $10 at WalMart a few years ago. It's divided into three sections each with two labeled file folders. The first section handles bills, both paid and current. The middle section handles coupons & receipts. The last section handles misc. mail and mailing supplies.

When I bring in the mail, I dump it on the counter in front of this sorter. Any junk mail gets dumped in the trash (it's nearby). I open and throw out all envelopes. Any bills go into the 'Current Bills' folder. Coupons I think I might actually use I put into the 'Coupons' folder. The magazines that require reading I toss over to the basket near the couch. Catalogs that I want to flip through, but don't have time for at the moment, are stashed behind the misc. folder. Whenever I'm stirring something or listening to messages, I grab one of these catalogs from the folder, flip through it, and then toss it.

On Sunday nights after the kids go to bed, I pay my bills. I grab the 'Current Bills' folder and pay all my bills online. Once I've paid the bill online, I write a slash across it, circle the amount (or write it in, if it's different), and jot down the date. When I've paid all the bills in the pile, I add them to the 'Paid Bills' folder. Generally these hard copies stay in this folder for around 3 months and then get shredded.

The 'Receipts' folder holds any receipts I dig out of my purse that day. Every month or so, I go through the receipts and pitch those that don't have any return potential. Those that have an item over $100 I add to the receipts binder (mentioned in a previous post http://meckmom.blogspot.com/2006/05/few-more-bright-binder-ideas.html) in the cupboard nearby.

The 'Misc.' folder holds any mail that doesn't fit into the other categories but that I want to hang on to, like invitations, credit card offers, and addresses from envelopes I want to keep. I also have a blank folder in the back that holds mail supplies. In it I have a few blank thank you cards, various envelopes, and stamps.

Again, this isn't the prettiest system, but it works. It keeps my counters clear while saving me time and late fees…in my book, that makes it worth it. Just thought I'd pass it on. Posted by Picasa
Saturday, July 01, 2006

Get MeckMom's favorites right in your inbox. Subscribe today.

Many of you link to my site via RSS, but I've learned that some of you would prefer a more direct method. As of today, I've added an email subscription link on my sidebar.

Subscribers will receive an email each time I add a new bright idea to the blog. If there are multiple postings on one day, they will be combined into one email before being sent. The email will include the latest postings as well as a link to get back to the site. I generally try to post once a week, so you can assume around 4 or 5 emails each month.

The service is powered by FeedBlitz. They were recommended by Blogger so I would assume their privacy policy is solid. However, if you'd like to check it out I'll list the link below. Thanks again to Erika for pointing this service out to me. I'm always happy to add another bright idea to the blog.

http://www.feedblitz.com/privacy.htm

Thursday, June 29, 2006

Save space and scratches by organizing your DVDs

At $20 a piece, DVDs present a problem. We buy them to keep our kids entertained while we get some much needed Mom time, but at that price we hesitate to let our kids touch them. Rather than be the constant middle man between the DVD player and my kids, I created this simple binder system.

The first step (and this is a tough one for some people) is to ditch all the plastic cases. The fact of the matter is that most scratches come not from using the DVDs but from kids trying to take them out or put them back in their cases. Save yourself the hassles, the space and the scratches by purchasing these inexpensive and compact CD cases.

I purchased three different colored cases to help keep my family organized. The first case is for kid's DVDs. The second is for Mom & Dad movies. The third holds all the "bonus features" DVDs that we never watch but can't seem to throw away.

The color coded cases and the easy flip-through, clear sleeves help them find exactly what they're looking for. Better yet, there's no particular order to the DVDs so when they need to put one away, they flip through the sleeves until they find an empty slot. The sleeves are made of soft, flexible plastic so scratches are a thing of the past.

We've also found them very handy for road trips. Rather than sort through which DVDs we want to keep in the car, we grab the entire case and slide it under the front seat. It's also very handy when you want to keep your Mom & Dad DVDs out of the hands of little kids or babysitters. It's not a fancy system, but it simple, cheap and makes life just a little easier. Just thought I'd pass it on. Posted by Picasa

Thursday, June 22, 2006

More details on the 'Kid's Closet Organization' post

Thanks Erika, for you question about the details of the dresser system I listed on a previous post <http://meckmom.blogspot.com/2006_02_01_meckmom_archive.html>. Here are few of the specifics.

I have 5 plastic drawers in each kid's stack. I'll list them from the top down.

· Shoes & Accessories
This one holds all those miscellaneous items like belts, slippers, hats & cover-ups. It also holds any shoes they don't wear regularly. The shoes my kids wear on a daily basis (generally 1 or 2 pairs of casual and 1 pair of church) are kept in a big basket by the door.
· Underwear
This one is divided with foam core dividers (see previous post) into three sections. The first section holds undershirts and swimming suits. The middle section holds underwear. The last section holds socks and tights.
· Shirts
· Pants
· Pajamas


Dress shirts, jackets, and dresses hang on the rod above. My kids have fairly wide closets so I'm able to put two stacks facing each other in a closet with just enough room between for the drawers to open. However, when we had an apartment with smaller closets, I slid these under the beds and stacked one next to the crib.

As for the labels, I printed them on full-sheet sticker paper (I like Avery). I use laminating film (the cheap kind you buy in a roll) to cover and protect the label edges. I usually cut it about 1" larger than the label on all sides.

These drawers offer one more bonus in my house. There's about 8 inches of clearance between the back of the drawers and the side of the closet. I use that space as temporary storage for all the outdated clothes. Whenever I'm putting away laundry and come across something that doesn't fit or is no longer in season, I just toss it back behind the stack.
Once a quarter or so I pull the drawers out and retrieve all the old clothes. I pack them by size into big tubs, label them, and stash them in the basement.

If you're one of those people that can't sleep at night because there's a pile of unfolded clothes lurking behind your dressers, then this part of the system won't work for you. But it works great for me :). Just thought I'd pass it on.

Monday, June 19, 2006

More details on the 'Organize Your Games' post

After my last post, I went through my games and thought I'd add a few more details.

First off, there are tons of choices in these leftover-type containers. I thought I'd pass on a few of my favorites.

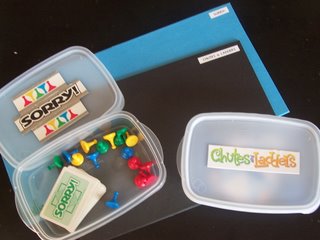
For the larger-size games (pictured here) I like the Glad-brand "family" size containers. For the smaller games, like Sorry or Monopoly, I use Rubbermaid brand. I can't remember what the containers are called on the label, but they have the number "2" on the lids and bases. Rubbermaid offers these number 2 containers in both open and divided styles. The divided containers are great for games with money, like Life or Monopoly, because they allow you to store the money separate from all the pieces.

As for the game rules, I stash those in a sheet protector that's stored in the trunk with the boards. There are a few games that print the rules on the box, but most common game instructions are available online if you search Google. Simply print what you need and add them to your packet.

One more loosely related tip, if you have any of those obnoxiously loud kids games like Duck Pond or The Fishing Game, you may want to experiment with the batteries. I found out, completely by accident, that if I removed one of the batteries from our Duck Pond game the pond would still move but the annoying quacking sound was disabled. Just thought I'd pass it on. Posted by Picasa

Thursday, June 15, 2006

Replace flimsy cardboard game boxes with stackable plastic


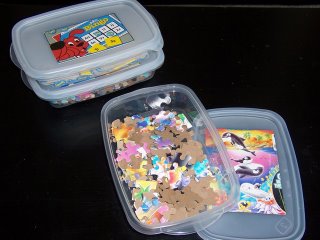
Thanks to Julianne for your question about games and puzzles. I'm a big game lover. My house has tons of games and puzzles. However, I hate the bulky, awkward boxes they come in. So I opted to pitch the cardboard and replace it with stackable plastic.

Like I said, I have tons of games, so I used the most inexpensive container I could find. These disposable plastic containers designed for leftovers were both cheap and shallow (unlike most tougher plastic containers). In most cases, I just cut the image of the puzzle or game right off the original box (generally the sides work well) and stuck it to the lid with double-stick duct tape.

I used my label-maker (WalMart $15) to make a small label to put on the back of each folded game board. The game boards are stacked together and are kept in the trunk with the game piece containers.

I also have one container that stashes extras. In it, I keep a few extra dice, a timer, some random pieces from old games, a notepad and some pencils.

Unfortunately not all my games will store this neatly. Games like Connect Four, Hullaballoo, and Battleship are still stuck in their original containers. But the vast majority of my games are now contained and much more accessible.

As a side note, Julianne, if you were referring to the wooden-type kids puzzles, I have a bunch of those too. I treat these like they are one toy rather than individual toys. I keep all the pieces for all the puzzles in one container. The puzzle boards stack on my son's shelf next to the container. Whenever he wants to do a puzzle, he lays out all the boards, dumps out the container and finds the pieces he needs. The bonus here is that he'll stay focused much longer. When it was just one puzzle, he'd finish too quickly and get bored. Now it takes time and keeps him interested. Of course, it also offers a very quick clean-up…a must for me. Just thought I'd pass it on. Posted by Picasa

Thursday, June 08, 2006

Control your pantry mess for under $30

At first glance, my pantry seems a little over the top. Most people see all the bins and the labels and assume I'm some sort of neat freak. However, if they'd look closer, they'd realize that these bins help me save money, time, and endless "Mom, where's the peanut butter?" type questions.

I used to have a normal pantry, but it caused all kinds of problems. First off, I found myself buying extra stuff all the time because I could never remember what I had. Now I can do a quick scan of the bins and make my grocery list. I also hated that my family couldn't seem to grasp my invisible system. Most items had a basic location in my mind (you know, bread here, cereal there, etc.) but no one else seemed to be able to keep it up. Now, my 6-year old can unload all the groceries and put stuff in the right bins. Another annoyance with the old system was that I found myself making several trips to the pantry to get various ingredients for whatever I was making. Now if I'm making cookies, I grab the whole Baking Supplies bin and bring it to the counter. Before the bins, I used to find M&Ms and chocolate chips spilling all over the shelves. Now if something spills, it's contained so it's tons easier to clean.

I started with just two bins, but found them so handy that I quickly filled up my shelves with a dozen or so. I'll list them here:

Treats: Candy, popcorn, marshmallows, etc.

Beverages: Hot chocolate mix, Crystal Light, Kool-Aid etc.

Dessert Supplies (I have two of these): Chocolate chips, pudding mix, frosting, sprinkles, cupcake liners, nuts, birthday candles etc.

Baking Supplies: Baking soda, vanilla extract, baking powder, Crisco, cocoa, etc.

Pasta: Boxed pasta, soup noodles, etc.

Lunch Supplies: Mac & Cheese, Ramen noodles, peanut butter, etc.

Dinner Supplies: Rice, bread mixes, seasoning packets, bottled marinades, etc.

Canned Soups: Soups

Canned Produce: Canned fruits and veggies

Snacks: Chips, raisins, fruit snacks, sack lunch fillers

Baking Products: Bags of flour, sugar, salt, yeast etc. (whatever's left in the bag after I fill the containers in the spice cupboard)

These cheap bins have lasted 6 years now. I change the labels every few years, but the bins have never needed replacing. I have a pretty large pantry now, but in our smaller apartments I used the lids and stacked the less used items under the more common ones to conserve space.

As an added bonus, they also made moving from one place to another a breeze. I just put the lids on, stacked them up and taped them all together with packing tape. Simple, cheap and easy to maintain! Just thought I'd pass it on. Posted by Picasa

Tuesday, May 30, 2006

A few more bright binder ideas

After my last post, I had a few questions about the other sheet protector-filled binders in my cupboard. Here are a few of my favorites:

· Family Info Binder: This one keeps track of all those papers sent home with my kids for their various activities. Anything from soccer schedules to Brownie Scout phone numbers to preschool weekly themes winds up here. In the binder, I've got 3 dividers for each of my kids (i.e. Jack's calendars, Jack's directories, Jack's misc info). When papers come home, I stick them in here and then bring the binder with me whenever I update the family calendar.
· Receipts Binder: Most of my receipts end up in the trash once I know I won't be returning anything. However, I like to hang on to big ticket receipts just in case I need it for warranty issues. Any single item that's more than $100 goes into a sheet protector in this binder. I've got it divided by the common stores I shop, so I can find things quickly. There's also a misc. divider for all those random purchases.
· Manuals Binder: This one's pretty self-explanatory. I never knew what to do with those annoying instruction manuals that come with every appliance and electronic thing. Finally, I created this binder. Now when I need to remember how to work my phone, check on a warranty, or order extra parts for my vacuum I know just where to look.
· Directories Binder: This one holds all those phone numbers that I need often. Church directories, school directories, neighborhood directories, they all end up here.
· Decorating Ideas Binder: I can't afford anything in the Pottery Barn or Restoration Hardware catalogs, but I love to copy their ideas. Rather than hang on to the whole catalog I rip out the pages I like and stick them in this binder. It's divided by room and has a little pack of post-its in the front so I can jot down what I liked about that particular picture. The same concept could work for recipes, family fun ideas, or anything else you tend to hang on to.

I've got a few others binders stashed around the house, but these are the "have to keep it in the kitchen so I actually use it" binders. Just thought I'd pass it on.

Wednesday, May 24, 2006

Keep important documents organized with this simple binder system


I'm not a fan of file cabinets. They're bulky, expensive and inconvenient. I like everything within reach so I use three-ring binders filled with sheet protectors and keep them in my kitchen cupboard.

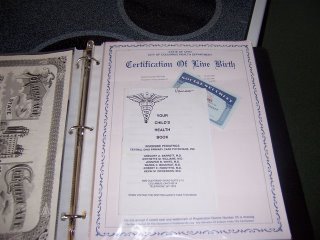
One of my favorites is my important documents binder. I've got dividers for Vital Records, Insurance, Mortgage, Cars, Credit Reports, etc. The sheet protectors keep all of these critical documents safe. Each member of the family has a sheet protector in the vital records area. I keep their birth certificates, passports, SS cards, and shot records in it.

The thing I love about this system is its convenience. Whenever I have to make a trip to the DMV, register the kids for school, visit a new doctor, whatever...I just grab the binder. Whatever paperwork they need, I always know I'll have it handy.

It's also great for emergencies. If there was a fire or any other type of crisis, I know that all our critical info is within reach. It's been a great system for me. Just thought I'd pass it on. Posted by Picasa

Monday, May 15, 2006

Great Home-Canning Solution

Okay, I'll admit it, I'm not much of a canner. In fact, I only do freezer jam because I can't bear to eat the store stuff. You die-hard canners probably knew about this product years ago, but I just discovered it last summer and will never go back to those bulky glass jars again. This handy alternative is made by Ball Canning Co. and sells at WalMart during the summer months. I've been using them for a year now and think they're perfect for my needs.

I had many issues with the traditional glass jars. First off, they are fragile. I usually send my kids down to the basement freezer to retrieve jam for me and when I used the heavy glass version I was always a little nervous about the results. I also hated storing the empty glass jars in my cupboards. They're bulky and take up way too much of my limited cupboard space. Additionally, the rings usually wandered off with my kids over time so that by the time I was ready to can again I had no tops to work with.

These lightweight, dishwasher-friendly, plastic jars solved all those problems. They can be dropped over and over again and the tops won't pop open (the lids are the twist-on type). They empty ones stack neatly in the back of my cupboard and double as cups when I've avoided the dishes for too long. The lids have a little well that allows for easy stacking when full. I can usually stack them 4 high in my freezer which saves me a lot of much needed shelf space.

The only drawback I've found is that they only come in this smaller size. I wrote to Ball to request a larger version and they said they were working on it. Regardless, I think the small version is a great solution for now. Just thought I'd pass it on.

Posted by Picasa

Sunday, May 07, 2006

Quick and easy Reward System for your kids

I used to be a complusive chart maker. I would go through phases where I'd make a sticker chart for various things like brushing their teeth, eating their veggies, cleaning their rooms, etc. Unfortunately though, after the 'this new system will solve all my problems buzz' wore off I'd often forget to keep track and the charts would lose their effectiveness. Over time I simplified, and created this simple sticker system.
I bought an inexpensive book of sticker sheets at Target and cut each page into thirds. I printed and laminated each of the kids names and then taped it all into my kitchen cupboard (easy access is key). They each set a goal for what reward they're working for and we jot it down on a post-it and stick it up next to their stickers.
My kids have come up with all kinds of rewards. Anything from having 2 friends over at once to a trip to the video store is fair game.
They earn stickers by doing anything on their own that I happen to notice, like cleaning their room or eating a least favorite food. Generally the stickers end up on their shirt so they can show them off to their siblings, but it doesn't really matter to me...as long as their not on my furniture.
I also use the stickers to break bad habits. For example, when my first grader refused to write her name in lower case letters, I would put a sticker on each paper she brought home with the correct lettering.
When the sticker sheet is empty, they get their reward and a new sticker sheet goes up. It's a simple system, but it seems to work perfectly for our family. For about $5 I've got a 6-month supply of stickers and a chart-free fridge. It's tough to beat that. Just thought I'd pass it on. Posted by Picasa

Tuesday, April 04, 2006

The easiest way to hang pictures...no level required

Maybe I was just way out of the loop on this one, perhaps you've all been using these for years, but I just discovered them and had to pass it on.

I've been using the 3M command adhesive hooks forever and found them very useful. So, when I happened upon these picture hangers based on the same 'easy-remove' technology, I had to give them a shot. By the way, I found them near the hooks in the Wal-Mart hardware department. I believe they were around $3 for 3 hangers.

I couldn't believe how easy they were! I'm horrible at hanging pictures. I hate all the measuring and leveling. I also have a newly painted house and dreaded putting holes in all the walls. These handy little velcro hooks provided a great solution. Essentially, they work like the hooks. Whenever you decided you want to remove the hanger (off the back of your picture or off the wall) you simply pull down on the hanging tab and it pops right off. The two velcro strips can separate without pulling the strip off the wall, so it's really easy to pull all your pictures off for cleaning and then put them right back on.

When I created this arrangement, I laid them out on the floor and figured out how I would want them to look on the wall. Then, I took a picture of the floor arrangement with my digital camera. After that, I stuck both pieces of the velcro hangers on the backs of all of the frames. I then placed the frames on the wall (starting from the center and working out) by referencing the thumbnail-size picture on my camera. In less than 10 mintues, I had a cute, well spaced arrangement on my wall and I didn't use a nail, measuring tape or level. Better yet, when I get sick of it or when I need to add new pictures, I can easily rearrange the pictures without any damage to my wall. Just thought I'd pass it on. Posted by Picasa