Thursday, June 29, 2006

Save space and scratches by organizing your DVDs

At $20 a piece, DVDs present a problem. We buy them to keep our kids entertained while we get some much needed Mom time, but at that price we hesitate to let our kids touch them. Rather than be the constant middle man between the DVD player and my kids, I created this simple binder system.

The first step (and this is a tough one for some people) is to ditch all the plastic cases. The fact of the matter is that most scratches come not from using the DVDs but from kids trying to take them out or put them back in their cases. Save yourself the hassles, the space and the scratches by purchasing these inexpensive and compact CD cases.

I purchased three different colored cases to help keep my family organized. The first case is for kid's DVDs. The second is for Mom & Dad movies. The third holds all the "bonus features" DVDs that we never watch but can't seem to throw away.

The color coded cases and the easy flip-through, clear sleeves help them find exactly what they're looking for. Better yet, there's no particular order to the DVDs so when they need to put one away, they flip through the sleeves until they find an empty slot. The sleeves are made of soft, flexible plastic so scratches are a thing of the past.

We've also found them very handy for road trips. Rather than sort through which DVDs we want to keep in the car, we grab the entire case and slide it under the front seat. It's also very handy when you want to keep your Mom & Dad DVDs out of the hands of little kids or babysitters. It's not a fancy system, but it simple, cheap and makes life just a little easier. Just thought I'd pass it on. Posted by Picasa

Thursday, June 22, 2006

More details on the 'Kid's Closet Organization' post

Thanks Erika, for you question about the details of the dresser system I listed on a previous post <http://meckmom.blogspot.com/2006_02_01_meckmom_archive.html>. Here are few of the specifics.

I have 5 plastic drawers in each kid's stack. I'll list them from the top down.

· Shoes & Accessories
This one holds all those miscellaneous items like belts, slippers, hats & cover-ups. It also holds any shoes they don't wear regularly. The shoes my kids wear on a daily basis (generally 1 or 2 pairs of casual and 1 pair of church) are kept in a big basket by the door.
· Underwear
This one is divided with foam core dividers (see previous post) into three sections. The first section holds undershirts and swimming suits. The middle section holds underwear. The last section holds socks and tights.
· Shirts
· Pants
· Pajamas


Dress shirts, jackets, and dresses hang on the rod above. My kids have fairly wide closets so I'm able to put two stacks facing each other in a closet with just enough room between for the drawers to open. However, when we had an apartment with smaller closets, I slid these under the beds and stacked one next to the crib.

As for the labels, I printed them on full-sheet sticker paper (I like Avery). I use laminating film (the cheap kind you buy in a roll) to cover and protect the label edges. I usually cut it about 1" larger than the label on all sides.

These drawers offer one more bonus in my house. There's about 8 inches of clearance between the back of the drawers and the side of the closet. I use that space as temporary storage for all the outdated clothes. Whenever I'm putting away laundry and come across something that doesn't fit or is no longer in season, I just toss it back behind the stack.
Once a quarter or so I pull the drawers out and retrieve all the old clothes. I pack them by size into big tubs, label them, and stash them in the basement.

If you're one of those people that can't sleep at night because there's a pile of unfolded clothes lurking behind your dressers, then this part of the system won't work for you. But it works great for me :). Just thought I'd pass it on.

Monday, June 19, 2006

More details on the 'Organize Your Games' post

After my last post, I went through my games and thought I'd add a few more details.

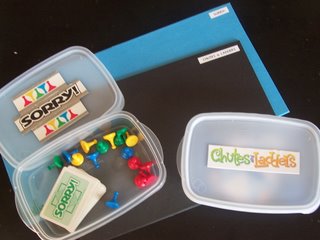
First off, there are tons of choices in these leftover-type containers. I thought I'd pass on a few of my favorites.

For the larger-size games (pictured here) I like the Glad-brand "family" size containers. For the smaller games, like Sorry or Monopoly, I use Rubbermaid brand. I can't remember what the containers are called on the label, but they have the number "2" on the lids and bases. Rubbermaid offers these number 2 containers in both open and divided styles. The divided containers are great for games with money, like Life or Monopoly, because they allow you to store the money separate from all the pieces.

As for the game rules, I stash those in a sheet protector that's stored in the trunk with the boards. There are a few games that print the rules on the box, but most common game instructions are available online if you search Google. Simply print what you need and add them to your packet.

One more loosely related tip, if you have any of those obnoxiously loud kids games like Duck Pond or The Fishing Game, you may want to experiment with the batteries. I found out, completely by accident, that if I removed one of the batteries from our Duck Pond game the pond would still move but the annoying quacking sound was disabled. Just thought I'd pass it on. Posted by Picasa

Thursday, June 15, 2006

Replace flimsy cardboard game boxes with stackable plastic


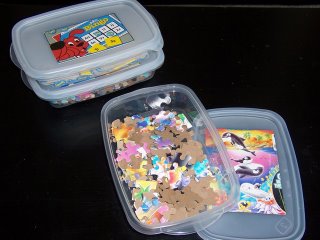
Thanks to Julianne for your question about games and puzzles. I'm a big game lover. My house has tons of games and puzzles. However, I hate the bulky, awkward boxes they come in. So I opted to pitch the cardboard and replace it with stackable plastic.

Like I said, I have tons of games, so I used the most inexpensive container I could find. These disposable plastic containers designed for leftovers were both cheap and shallow (unlike most tougher plastic containers). In most cases, I just cut the image of the puzzle or game right off the original box (generally the sides work well) and stuck it to the lid with double-stick duct tape.

I used my label-maker (WalMart $15) to make a small label to put on the back of each folded game board. The game boards are stacked together and are kept in the trunk with the game piece containers.

I also have one container that stashes extras. In it, I keep a few extra dice, a timer, some random pieces from old games, a notepad and some pencils.

Unfortunately not all my games will store this neatly. Games like Connect Four, Hullaballoo, and Battleship are still stuck in their original containers. But the vast majority of my games are now contained and much more accessible.

As a side note, Julianne, if you were referring to the wooden-type kids puzzles, I have a bunch of those too. I treat these like they are one toy rather than individual toys. I keep all the pieces for all the puzzles in one container. The puzzle boards stack on my son's shelf next to the container. Whenever he wants to do a puzzle, he lays out all the boards, dumps out the container and finds the pieces he needs. The bonus here is that he'll stay focused much longer. When it was just one puzzle, he'd finish too quickly and get bored. Now it takes time and keeps him interested. Of course, it also offers a very quick clean-up…a must for me. Just thought I'd pass it on. Posted by Picasa

Thursday, June 08, 2006

Control your pantry mess for under $30

At first glance, my pantry seems a little over the top. Most people see all the bins and the labels and assume I'm some sort of neat freak. However, if they'd look closer, they'd realize that these bins help me save money, time, and endless "Mom, where's the peanut butter?" type questions.

I used to have a normal pantry, but it caused all kinds of problems. First off, I found myself buying extra stuff all the time because I could never remember what I had. Now I can do a quick scan of the bins and make my grocery list. I also hated that my family couldn't seem to grasp my invisible system. Most items had a basic location in my mind (you know, bread here, cereal there, etc.) but no one else seemed to be able to keep it up. Now, my 6-year old can unload all the groceries and put stuff in the right bins. Another annoyance with the old system was that I found myself making several trips to the pantry to get various ingredients for whatever I was making. Now if I'm making cookies, I grab the whole Baking Supplies bin and bring it to the counter. Before the bins, I used to find M&Ms and chocolate chips spilling all over the shelves. Now if something spills, it's contained so it's tons easier to clean.

I started with just two bins, but found them so handy that I quickly filled up my shelves with a dozen or so. I'll list them here:

Treats: Candy, popcorn, marshmallows, etc.

Beverages: Hot chocolate mix, Crystal Light, Kool-Aid etc.

Dessert Supplies (I have two of these): Chocolate chips, pudding mix, frosting, sprinkles, cupcake liners, nuts, birthday candles etc.

Baking Supplies: Baking soda, vanilla extract, baking powder, Crisco, cocoa, etc.

Pasta: Boxed pasta, soup noodles, etc.

Lunch Supplies: Mac & Cheese, Ramen noodles, peanut butter, etc.

Dinner Supplies: Rice, bread mixes, seasoning packets, bottled marinades, etc.

Canned Soups: Soups

Canned Produce: Canned fruits and veggies

Snacks: Chips, raisins, fruit snacks, sack lunch fillers

Baking Products: Bags of flour, sugar, salt, yeast etc. (whatever's left in the bag after I fill the containers in the spice cupboard)

These cheap bins have lasted 6 years now. I change the labels every few years, but the bins have never needed replacing. I have a pretty large pantry now, but in our smaller apartments I used the lids and stacked the less used items under the more common ones to conserve space.

As an added bonus, they also made moving from one place to another a breeze. I just put the lids on, stacked them up and taped them all together with packing tape. Simple, cheap and easy to maintain! Just thought I'd pass it on. Posted by Picasa